Standalone LinuxCNC console - 1/2

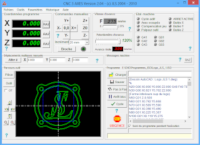
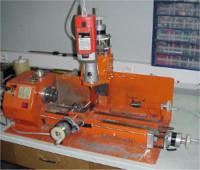
Creation of a fully autonomous CNC control console (no need for a computer) with an architecture based on the use of a Beaglebone Black board configured with MachineKit (Embedded LinuxCNC), this console allows you to control up to 5 axes and is equipped with a touch screen allowing access to all functions of LinuxCNC. The Beaglebone has many inputs / outputs which allows to have the necessary functions for most hobbyits machining machines. 
This page describes the genesis of this project since the elaboration of the specifications set until the settings and tests on machine. 
To date, in 2018, the project is in progress, so this page will be enriched as and when the progress. 
 
The articles are in two parts, the first part deals with the specifications on the interface board, the second part describes the realization of the console and its configuration.

Specifications

Overview

This control cabinet aims to replace the software Cnc3Axes installed on a workshop PC to control my lathe / milling unit and possible future developments such as the addition of rotary axis. 
The interface to the stepper motor drivers should no longer use end-of-life ports (LPT). 
The interface must be user-friendly and intuitive, if possible close to an industrial interface. 
The entire project must not use proprietary software and code adaptations must remain possible. 
Avoid personal developments that are too heavy and complex (risk of not succeeding). 

Desired features

1-Control from 1 to at least 5 axis. 
2-Operate speeds and acceleration ramps. 
3-Step flow of at least 50kHz which allows the use of micro-steps (gives 1800mm / min with a screw pitch of 1 and 1600pas / turn). 
4-Operate spindle on / off and speed, if possible with speed control. 
5-Possibility of threading on lathe, requires speed measurement and spindle index. 
6-Limits for the 3 linear axes. 
7-Simultaneous linear interpolation on at least 3 axes. 
8-Circular interpolation on the different planes. 
9-Corrections of tools and tool change. 
10-Operate machine and part origins.
11-Operate soft and electric emergency stop. 
12-ISO program code interpretation (G-code). 
13-Entering orders and programs in MDI. 
14-Soft jog mode. 
15-Possibility of acting on spindle speeds and feedrate during machining (override potentiometers). 
16-Possibility of integrating an "electronic crank". 
17-Piloting auxiliary outputs (cooling, vacuum, etc ...) 
18-Possibility of automatic tool changer. 
19-Possibility of conversational or learning programming. 
20-Possibility to take pauses during a machining and resume (checks). 
21-Possibility to extend the number of inputs / outputs. 
22-Backlash compensation.
Sinumerik 840D (Siemens picture)
On the basis of this functional specification, with my Swiss friend Thierry (THL), we undertook research on the web to see what is done and to determine the best choice for the hobbyists that we are. 
Both, our pleasure for technical challenges means that we do not discard the possibility of creating our own boards or software if we do not find what we want "turnkey". 
See more
Cnc3Axes
Free software for CNC machine control, downloadable on this site.
Machine tools
How to build your own machines to machine metals, to see on this site.
See more
Cnc3Axes
CNC software controller
Machine tools
Build your own machine tools

Technical hypoteses and our choice

The hypotheses

Of course we have not found a turnkey solution and freeware available, but despite all there is some available hypotheses for us : 
1-IPL5X board with a software interface to develop because those proposed are not well adapted to the machining of mechanical parts. 
2-GRBL project on Arduino also with software to develop for the same reasons of adaptation to mechanical machining. 
3-PC dedicated to LinuxCNC to which it is necessary to add an interface board, it is undoubtedly the most reliable solution, but it requires a PC under Linux. 
4-Development of an interpolator board such as IPL5X with the missing features (eg feed  and spindle overrides) and adapted software. 
5-Development of a fully autonomous control board as it is done for some 3D printers. 
6-Use of a single board computer with integrated inputs/outputs and embedded Linux for LinuxCNC (Rapsberry, PCduino, UDoo, Beaglebone). 
 
This list is of course not exhaustive, it is only the hypoteses that we have studied more closely. 

Analysis of hypotheses

With Thierry, we built this card which during the first tests in 2013 seemed very promising because still in development at the time. It is an interpolator that requires software on PC / USB to send it instructions for moves but unlike Cnc3Axes, it is the board that operates the interpolations and the flow of steps. I made a test bench with LeadShine M542 stepper drivers and the performance was very good. 
However, it was necessary to develop an interface software adapted to mechanical machining which is very time-consuming and complex. 
We have not retained this solution, especially since, in 2018, the development of the IPL5X board seems to be stopped.
GRBL is an open source development that runs on Arduino Uno or Mega. It is an interpolator that like IPL5X requires  a software on a PC connected by USB to communicate the execution orders and collect the necessary information for a good human-machine interface. 
As for IPL5X there is already communication software, but none is really available for mechanical machining.
UDOO and PCduino
Both are single board computers that can run on Linux, UDOO seems more advanced but both are designed to be compatible with Arduino shields which opens the door to GRBL or LinuxCNC implementations. 
In both cases we did not do any tests because we did not have the equipment.
LinuxCNC on PC
We no longer present LinuxCNC, all hobby CNC fans know, it is in my opinion the top in terms of driving, plus it is free and open source software. 
Everything is configurable and the number of applications and information available on the web are numerous.
Personal board
Not even afraid ! We also considered the complete development from the interpolation board to the software. In the idea, Thierry who is more successful than me in electronics would have taken charge of the  board and I would have developed the software in C++ with Qt framework. 
Of course, we quickly abandoned this hypothesis, which probably would never have been possible due to lack of time to develop.
LinuxCNC on Beaglebone Black
The Beaglebone Black board has the advantage of having many inputs/outputs, an SD slot, USB and HDMI. Moreover it is possible to easily implement MachineKit which is a clone of LinuxCNC able to work on ARM processors. 
The icing on the cake is that the Beaglebone Black (BBB) ​​has two processors "real time" which on this point makes it more powerful than a Raspberry. 
So I made a prototype test with this board that is cheap (45 € in 2018) to analyze the performance with M542 LeadShine. 
And there, I was blown away, as much as saying that our choice was made.

Our choice

After the various tests, the choice of the Beaglebone Black implanted with MachineKit has become essential because there are already some projects made on this basis and the most important for a start is that system images with MachineKit are available for download which limits enormously the risk of failure when installing the system. The prototype set almost worked the first time. 
It remains to study an interface board (cape) meeting our needs perfectly inspired by those existing for 3D printers and more particularly the Cramps board.

The layout, pcb and making of this board are the subject of the next article on this page. 
See more
IPL5X Board
Interpolator board based on a 18F4550 peak in USB connection with a PC.
GRBL
Open source interpolator project implemented on an Arduino Uno or Mega board.
Linux CNC
Fully parameterizable, free and open source machine control environment in Linux. 
The top of hobby CNC control.
Beaglebone
The boards of the Beaglebone family, an open source project
MachineKit
Derived from LinuxCNC, Machinekit uses the same base but is adapted to ARM board and embedded systems such as the Beaglebone.
LeadShine
Drivers supplier for step by step and brushless
See more
IPL5X board
Interpolator board 18F4550
GRBL
Interpolator on Arduino
Linux CNC
CNC controller on Linux
Beaglebone Black
Beaglebone project
MachineKit
CNC controller for embedded LinuxCNC
LeadShine
Stepper and brushless drivers

BBB-CNC-Cape interface board : the prototype

Board overview

The Beaglebone Black board's inputs/outputs only support 3.3V voltage levels making them uncompliant with most drivers or other interfaces that typically use 5V. This is why it is not possible to directly connect the Beaglebone with the different components, so you need an interface board, called "cape" for the voltage levels adaptation. The other role of this cape is to bring all the signals to simpler connectors to wire in a cabinet. 
 
Not finding a cape ready made to our specifications, we decided to create our own interface inspired by the cape CRAMPS which is itself very oriented for 3D printer functions. 
This cape has the following features: 
 
- 5 axes with the lines pulse+dir+enable (enable common to the 5 axes). 
- 1 spindle control ON/OFF+PWM+CW/CCW. 
- 6 limit inputs for the 3 linear axes. 
- 9 auxiliary inputs/outputs that can be used as inputs or outputs by setting LinuxCNC. 
- 3 spindle encoder inputs A+B+Index. 
- 2 analog inputs dedicated to override potentiometers F and S. 
- 5 analog inputs available (0 to 1.8V). 
- 1 I2C output 5V. 
- 1 I2C output 3.3V. 
- 1 EEPROM to allow automatic configuration of the Beaglebone during boot (it is not imperative that it be programmed). 
 
The complete file with schema, PCB and components position is available for download, of course I will appreciate a small message if you download it. 
 
In addition, you will find the layout of the functions, as we chose them for our applications, on the diagram of the connectors .

Prototype board making

The cape seen from the connectors side, this side will be Beaglebone Black side. 
In black the connectors for the Beaglebone. 
On the right 5 axis connectors and 1 for spindle. 
On the left are the available analog inputs and two connectors for the override potentiometers (F and S). 
On the left are the emergency stop and output connectors for the running and emergency warning lights. 
Top and bottom connectors for 6 limit switchs, auxiliary inputs/outputs and I2C port.
Components side view, it should be noted that to save maximum space, the board is totaly made with SMD components. I chose not too miniaturized SMD in order to weld them with traditional tools, it's much simpler than it seems, except that with a little worn eyes it is imperative to use magnifying glass. 
The main components used for voltage adaptation are 74AC541 for fixed input or output lines and 74CBTD3861 for lines where input or output can be selected by software setting. 
You can see the complete PDF layout.
One of the most difficulties in producing this board was the etching of the printed circuit. The choice to use SMD imposes a fine and precise etching, luckily, it was not necessary to etch in double face, there are still two straps side connectors not to forget. 
Of course it is still possible to order the circuit to professional suppliers, but it is much more funny to do it yourself. 
The technique used is simple but it must be very rigorous in the implementation. 
Print the pcb layout on a transparency (pay attention to dimensions and invert the image if necessary), expose your pcb with a small UV bench, reveal with new developer to be very precise. Etching was done with sodium persulfate heated to 40°C and agitated with an aquarium bubbler. With this technique, the result is almost perfect from the second test. 
Be careful because an engraving with perchloride iron or worse the mixture hydrogen chloride hydrogen peroxide will not give a correct result. 
For easy and perfect welding, it is also necessary to treat the tinning of the circuit after etching.
The welding of the components can be done with a soldering iron regulated in temperature, ideally it is also necessary to add a little special flux for the SMD but it is not essential. 
The mounting starts with the resistors and the capacitors, continues with the transistors then the integrated circuits and finish with the connectors. 
You can see the components layout and download the complete file.
As for the Beaglebone Black, the inputs are assigned as shown on the sketch and can be viewed on the cape layout a part of the P8 connector is not used because reserved for other features (GLCD between other), that's why a part of the corresponding connector on the cape has been removed which saves space for other components. 
The sketch below shows the I/O choices as they were set up for the prototype and for the final console panel. Of course all auxiliary inputs/outputs can be changed if necessary (true for all inputs/outputs interfaced by 74CBTD3861). 
Always in order to save space to place all the connectors, the BBB-CNC-Cape does not have the keying characteristic of capes for Beaglebone, so be careful when connecting.
The interface cape is now made and tested. The operation is good and it remains only to integrate in the cabinet for all to be functional. 
The second part will describe the making of the console panel and its wiring, then the setting of MachineKit (LinuxCNC) to give life to all this material.
WARNING :
The last tests made on August 14, 2018 revealed a failure of the 74LS541 in the AXE-ENABLE channel, the fact of connecting more than 3 drivers overloads the output which is limited to 32mA, the output has therefore burned after a few running hours.
Don't build this board from the prototype layout.

Three new layouts are actually in test, I will publish the new designs soon.
Download
BBB-CNC-Cape prototype
You can download all the PDF documents needed to build the BBB-CNC-Cape prototype. Only for information because this design have some bugs.
See more
CRAMPS project
CRAMPS is a Beaglebone cape for piloting 3D printers. CRAMPS is the basis for the BBB-CNC-Cape design.
PCB making
French site quite complete about printed circuits home making. You will find many other things in electronics as well.
PCB etching
Another site that explains how to etch printed circuit boards yourself.
Suppliers
Go Tronic
Sale of electronic components online. Very serious site, I order regularly.
Farnell
One of the references in online sales of components. You will find all the SMD and even the Beaglebone Black.
Download
BBB-CNC-Cape
Layout, pcb, components
See more
CRAMPS project
3D printers cape
PCB making
Very interesting blog
PCB etching
Another one
Suppliers
Go Tronic
Electronic components
Farnell
Electronic components and Beaglebone

Operational BBB-CNC-Cape interface board

New designs

After the realization and the tests of the prototype, we designed three new versions, on the one hand to fix the prototype bugs, and on the other hand to propose versions with a much more professional visual. 
These new layouts are based on two principles. 
The first is based on the prototype with the use of 74AC541 for outputs except for ENABLE which is treated by a mosfet 2N7002 is the cape "1" (BBB-CNC-Cape). 
The second replaces the 74AC541 by ULN2803 which allow 500mA output current which is much safer than the 30mA 74AC541 is the principle of capes "2" and "3". 
BBB-CNC-Cape and BBB-CNC-Cape-1 have the same connectors and are 100% compatible, BBB-CNC-Cape-3 has separate connectors function by function. 
These three cards were developed with the KiCAD software and are designed to be realized on a double-sided PCB with metallized holes.
BBB-CNC-Cape
BBB-CNC-Cape-2
BBB-CNC-Cape-3

Printing circuit boards

The new double-sided design with metallised holes almost makes it necessary to manufacture cards with industrial means. 
We chose to order them from a Chinese supplier, some of them offer very good quality for a very affordable price. 
 
If you decide to make the pcb yourself, it will be necessary to replace the metallized holes by welding on each face for all the holes.

Components welding

When writing these lines (March 2019) only BBB-CNCCape type 1 was mounted and tested. 
The welding starts with the back side with only CMS and the Beaglebone connectors, nothing difficult especially with a tinned pcb and solder mask. No more problems for the front side, only the integrated circuits require a little more care. To finish the connectors that can be vertical as I chose but also horizontal, the boards have been designed to adapt to the desires of users. If like me you mount this board in a box provided with signal leds connected to the connectors, no need to put them on the board.
Back side
Front side
With connectors
The new generation BBB-CNC-Cape is now plugged on the Beaglebone, the groove for the RJ45 connector is keyed, the leds of the BBB remain visible. 
 
This board is now installed in CNC cabinet and the tests are entirely satisfactory. 
 
As for the proto, the cape is equipped with an EEPROM for the automatic input/output setting, but of course nothing obliges to use it.
The two other bords do not have more problems of realization. I also made the BBB-CNC-Cape-2 to test the two designs, it will also make me a spare in case of problems.
BBB-CNC-Cape-2 top
The BBB-CNC-Cape-2 is almost similar to the BBB-CNC-Cape but allows a higher current for the outputs with the ULN2803. The building is the same as the previous one.
BBB-CNC-Cape-2 bottom
Now, you just have to download the files with the layouts, list of the components and masks to engrave the printed circuits. 

If, however, you like to use professional printed circuit boards, you can contact me because I have a few left. Do not hesitate to contact us for availability and prices.
Download
BBB-CNC-Cape
File of plans for the realization of BBB-CNC-Cape in version 09A. 
Interface with 74AC541.
BBB-CNC-Cape-2
PDF plans for the realization of BBB-CNC-Cape-2 in version 02A. 
Interface with ULN2803
BBB-CNC-Cape-3
PDF of plans for the realization of BBB-CNC-Cape-3 in version 02A. 
Special connectors.
Softwares
KiCAD
Electronic design free software. 
Suppliers
Go Tronic
Sale of electronic components online. Very serious site, I order regularly.
Farnell
One of the references in online sales of electronic components. You will find all the SMD and even the Beaglebone Black.
Mouser
Another reference in online sales of electronic components.
Download
BBB-CNC-Cape
Layout, pcb, components
BBB-CNC-Cape-2
Second version
BBB-CNC-Cape-3
Special connectors
Softwares
KiCAD
3D printers cape
Suppliers
Go Tronic
Electronic components
Farnell
Electronic components and Beaglebone
Mouser
Electronic components
Made with OpenElement
Date mise à jour  
CARNETS JL-S
Technical hobbies
Carnets JLS
Top page